Cutting and shaping wood is a fundamental skill in creating custom furniture. Moving beyond simple straight lines to crafting curves, angles, and unique profiles requires precision and the right approach. This guide will walk you through the essential steps to transform a flat board into a beautifully shaped piece for your next furniture project.
Part 1: Planning and Template Creation
A well-defined plan is the foundation of a perfect cut. This step ensures consistency and accuracy, especially if you need to create multiple identical pieces.
- Design Your Shape: First, design the exact shape you want to cut. This could be a curved chair back, a decorative tabletop edge, or a leg with a specific profile.
- Create a Template: The most effective way to ensure an accurate and repeatable shape is to create a template. Use a stable, flat material like MDF or thin plywood to draw and cut your shape perfectly. Take your time with this step, as any imperfections in the template will be transferred to your final piece.
- Safety Gear: As with any woodworking project, safety is paramount. Always wear eye protection and hearing protection. Use a dust mask or respirator when cutting or sanding.
Part 2: Rough Cutting the Profile
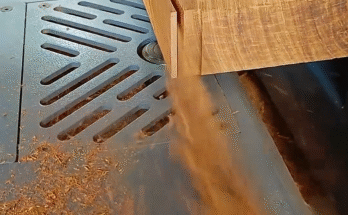
The goal of this stage is to remove the bulk of the material, getting you close to the final shape without touching the template.
- Trace the Template: Lay your template on your workpiece and trace the outline with a pencil.
- Attach the Template: Securely attach the template to the workpiece. Double-sided tape designed for woodworking works well, or you can use screws in areas that will be cut away or hidden.
- Perform the Rough Cut: Using a bandsaw or jigsaw, cut the workpiece, staying about 1/8 to 1/4 inch outside of your traced line. The goal is to remove the waste material and leave a small margin for precision trimming later.
Part 3: Precision Shaping with a Router
This is where the magic happens. A router with a pattern bit is the fastest and most accurate way to get a perfectly smooth, identical shape.
- Set up the Router: Place a flush-trim or pattern bit in your router. Ensure the bearing is set to ride against your template. The bearing is the small, round part at the end of the bit that guides the cut.
- Start the Cut: With the router securely mounted in a router table (or by clamping the workpiece for a handheld router), turn on the machine. Slowly and steadily guide the workpiece into the bit, allowing the bearing to follow the template’s edge.
- Cut in Multiple Passes: For thicker wood, it’s best to make several passes, lowering the bit a little each time. This reduces strain on the bit and prevents tear-out.
Part 4: Final Touches and Finishing
The last stage is all about refining the cut and preparing the piece for assembly and finishing.
- Remove the Template: Carefully detach the template from the workpiece.
- Final Sanding: The router will leave a clean, but sometimes slightly textured, edge. Use a sanding block or an oscillating spindle sander to smooth the edge completely, starting with a medium-grit sandpaper (around 120 grit) and moving to a finer grit (220 or higher) for a polished finish.
- Inspect the Shape: Check the shape for any imperfections. You can use a hand plane or a file for minor adjustments if needed.
By following this process, you can achieve professional-quality results and create custom, shaped pieces for any furniture project.