Are you looking for a unique, sustainable, and budget-friendly way to upgrade your home decor? This DIY Wine Bottle Shelf is the perfect upcycling project that transforms empty wine bottles and reclaimed wood into a stylish and functional piece of furniture. Whether you’re a woodworking enthusiast or a DIY beginner, this guide will walk you through the process of creating a rustic-industrial shelving unit that’s both aesthetically pleasing and eco-friendly!
Why Upcycle Wine Bottles? 🍷♻️
Every year, millions of glass bottles end up in landfills. Instead of tossing your wine bottles, why not turn them into a statement piece? Glass bottles are strong, durable, and can handle weight when positioned correctly, making them a perfect alternative to traditional shelf supports.
By reusing materials, you’re not only saving money but also contributing to a more sustainable lifestyle. Plus, this project adds a chic, upcycled touch to any space—whether it’s your kitchen, home bar, or living room.
Materials You’ll Need 🛠️
✔️ 4–8 empty wine bottles (preferably the same size for uniformity)
✔️ Reclaimed wood planks (for the shelves)
✔️ Metal turnbuckles (for extra stability and an industrial touch)
✔️ Screws and drill
✔️ Sandpaper or wood stain (optional, for finishing)
✔️ Measuring tape & level
Step-by-Step Guide to Building Your DIY Wine Bottle Shelf
Step 1: Prepare Your Wine Bottles
Before using the bottles, make sure they are clean and dry. Soak them in warm soapy water for 15–20 minutes to remove any labels. If any adhesive remains, use a mixture of baking soda and vinegar or a bit of rubbing alcohol to wipe it off.
💡 Tip: Choose green or brown bottles for a more rustic look, or use clear bottles for a modern aesthetic.
Step 2: Cut and Sand the Wooden Planks
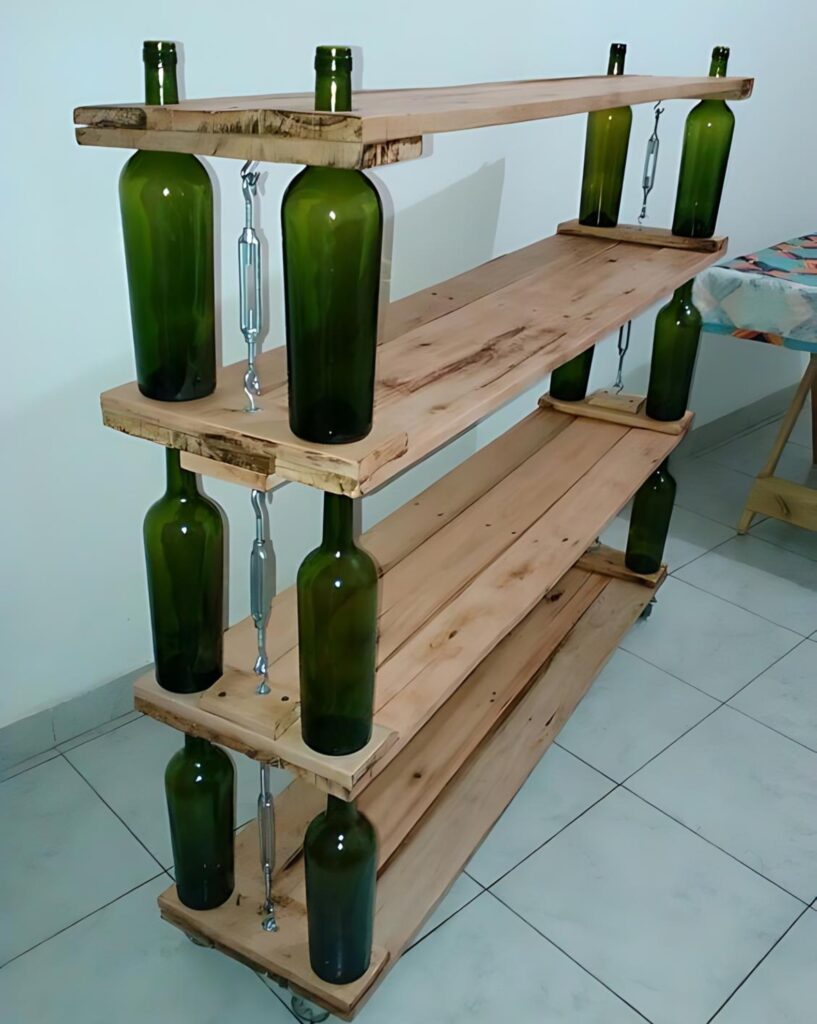
Decide how many tiers your shelf will have. Typically, a three to four-tiered unit works best. Measure and cut your reclaimed wood planks to the desired length, ensuring they are even.
Sand the wood to smooth out rough edges and, if desired, apply a wood stain or clear coat to enhance durability.
Step 3: Drill Bottle Openings
To create a secure structure, drill small recesses on the underside of each shelf where the wine bottle tops will sit. This prevents the bottles from shifting and ensures the shelves stay stable.
📏 Measure twice, drill once! Align the holes properly so that all bottles will be evenly spaced.
Step 4: Assemble the Shelf
Place four wine bottles upside down on the lowest shelf, ensuring they are evenly positioned at each corner. Carefully place the next wooden plank on top, ensuring the bottle necks fit snugly into the drilled recesses.
Repeat this process for additional layers. If needed, use a level to check the alignment.
Step 5: Reinforce with Turnbuckles (Optional but Recommended!)
To enhance stability and add an industrial touch, attach metal turnbuckles between each shelf layer. These will help prevent wobbling and give your shelf a sleek, modern edge.
Simply drill small hooks into the wood and tighten the turnbuckles between the layers.
Styling & Placement Ideas 🏡
Now that your DIY wine bottle shelf is complete, it’s time to style it! Here are some creative ideas:
✨ Use it as a bookshelf in your reading nook 📚
✨ Display your favorite wine collection on the top shelf 🍾
✨ Organize kitchen essentials like spices or coffee mugs ☕
✨ Add potted plants or fairy lights for extra charm 🌿💡
This versatile shelving unit will complement modern, farmhouse, rustic, or industrial decor effortlessly.
Final Thoughts: Why This DIY Project is Worth It
Building a DIY wine bottle shelf isn’t just about making furniture—it’s about turning waste into beauty. This project is:
✅ Eco-friendly – Reduce waste and repurpose materials
✅ Budget-friendly – Uses inexpensive or free materials
✅ Customizable – Adjust the size, color, and design to match your style
✅ Easy & fun – No need for advanced woodworking skills
So, grab those empty wine bottles and start building your very own upcycled masterpiece today!