Wood joints are fundamental components of woodworking, used to connect two or more pieces of wood to create structures, furniture, and decorative items. The process of crafting wood joints involves a combination of technical skill, precision, and understanding of wood properties. This essay explores the complete journey of processing wood joints—from preparation and selection of materials to the final finishing touches.
1. Understanding the Purpose of the Joint
Before any actual processing begins, the first step is understanding the purpose and functional requirements of the joint. Different types of joints serve different roles:
- Structural strength: Joints such as mortise and tenon or dovetail are used where strength and durability are crucial.
- Ease of assembly or disassembly: Knock-down joints, often found in modular furniture, prioritize ease of transport.
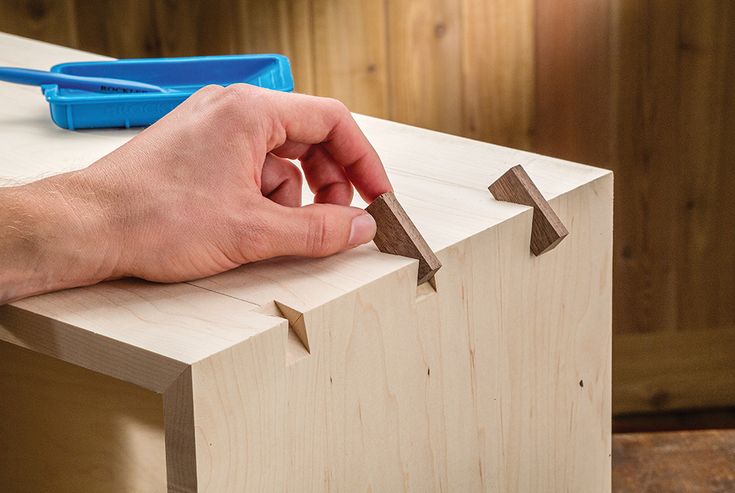
- Aesthetic value: Joints such as finger or butterfly joints offer decorative appeal alongside strength.
Knowing the intended use influences the choice of joint, tools, and techniques used throughout the process.
2. Selecting and Preparing the Wood
Wood selection is critical. Factors such as wood species, grain orientation, moisture content, and surface quality all affect joint performance. Hardwoods like oak, maple, and walnut are commonly chosen for their strength and stability, while softwoods like pine or fir may be used for less load-bearing applications.
Preparation steps include:
- Drying: Ensuring the wood is properly kiln-dried or air-dried to the appropriate moisture level (typically 6–8% for indoor use) to avoid shrinkage or warping.
- Surfacing: Jointed and planed wood provides flat and square surfaces, which are essential for tight, seamless joints.
- Marking: Accurate layout using measuring tools (rulers, marking knives, gauges) ensures precise joint placement.
3. Choosing the Type of Joint
Once the wood is prepped, the appropriate joint must be selected. Some common types include:
- Butt Joint: The simplest joint where two ends are simply butted together, often reinforced with screws or dowels.
- Lap Joint: A partial thickness joint where pieces overlap.
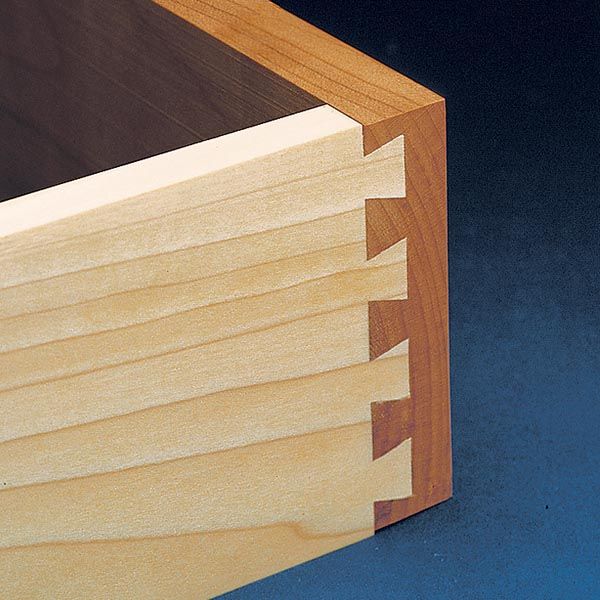
- Dovetail Joint: Known for its interlocking strength, often used in drawer construction.
- Mortise and Tenon: A classic joint involving a protruding tenon fitting snugly into a mortise.
- Finger Joint (Box Joint): Strong and decorative, formed by a series of interlocking rectangular “fingers.”
- Dowel Joint: Uses wooden pins (dowels) to align and strengthen the connection.
- Biscuit Joint: Oval-shaped wooden biscuits inserted into slots to align and hold edges.
4. Cutting the Joint
Precision cutting is the most technical and crucial stage of wood joint processing. Depending on the joint type, different tools and techniques are used:
- Hand tools: Chisels, backsaws, and hand planes offer control and are preferred for fine craftsmanship.
- Power tools: Table saws, routers, band saws, and biscuit joiners speed up production and improve accuracy in repeatable cuts.
- Jigs and templates: These aids ensure uniformity and accuracy, particularly for dovetails and mortise and tenon joints.
Key considerations during this step include:
- Tight tolerances: The fit between mating parts must be tight enough for strength but not so tight that it splits the wood.
- Clean edges: Clean cuts without tear-out ensure smooth fitting and better glue adhesion.
- Trial fitting: Dry assembly before gluing verifies accuracy.
5. Assembly and Adhesion
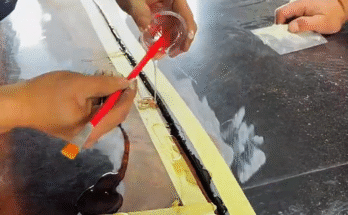
Assembly involves bringing the cut pieces together and securing them. Wood glue is commonly used, chosen for its strength and ability to bond well with natural fibers.
Steps include:
- Applying glue: Even coverage across mating surfaces ensures full adhesion.
- Clamping: Proper clamping pressure holds joints together while the glue cures. Over-clamping should be avoided to prevent glue starvation.
- Curing: Depending on the glue used, curing time may range from 30 minutes to several hours. Joints should not be stressed until fully cured.
Some joints may also be reinforced using mechanical fasteners like screws, nails, dowels, or splines, particularly in high-stress applications.
6. Cleaning and Shaping
After assembly and curing, excess glue is scraped or sanded off. At this point, the joint may be shaped or fine-tuned for a seamless appearance.
Tasks include:
- Sanding: Joints are sanded flush to ensure smooth transitions.
- Trimming: Excess tenons or fingers may be trimmed with a flush-cut saw.
- Filling: Any small gaps can be filled with wood filler or sawdust mixed with glue.
Precision at this stage contributes to the professional finish of the final product.
7. Inspection and Quality Control
Before finishing, joints are carefully inspected for structural and visual integrity. Checks include:
- Gaps or cracks: Gaps indicate poor cutting or assembly and can weaken the structure.
- Misalignment: Even slight misalignment can ruin the visual and functional quality of the joint.
- Movement: If the joint wobbles or shifts, it may need to be redone.
Reworking at this stage, though frustrating, is better than risking failure after finishing.
8. Finishing the Wood
The finishing stage protects the wood and enhances its appearance. A well-made joint should blend seamlessly into the overall surface or stand out as a decorative feature, depending on design intent.
Finishing steps:
- Sanding (final pass): Using progressively finer grit sandpaper to smooth the surface.
- Staining or dyeing: Enhances wood color while emphasizing or de-emphasizing the joint.
- Sealing: A sealant like shellac, lacquer, or polyurethane is applied for protection.
- Buffing: Optional polishing adds a professional, glossy look.
9. Maintenance and Longevity
Even the best joint can degrade over time due to environmental changes, wear, or poor usage. To ensure longevity:
- Avoid excessive humidity or dryness, which can cause swelling or shrinking.
- Use appropriate finishes for outdoor or high-moisture environments.
- Periodically inspect for joint movement or degradation and apply wood glue or reinforcements as needed.
Conclusion
Processing wood joints from start to finish is both a science and an art. It begins with selecting the right type of joint for the task and preparing high-quality wood. Through accurate cutting, careful assembly, and attention to detail, joints are crafted to be both strong and aesthetically pleasing. Finishing and maintenance round off the process, ensuring that these joints perform well and look beautiful for years to come. Whether crafted by hand or machine, wood joints are a testament to craftsmanship, precision, and the enduring nature of wood as a building material.