Wood joinery is an essential skill in carpentry and fine woodworking, enabling the creation of durable, aesthetically pleasing furniture and structures. Among the myriad techniques available, the wedged mortise and tenon joint stands out for its remarkable strength, time-tested reliability, and elegant engineering. This joint, a variation of the classic mortise and tenon, incorporates wedges to lock the tenon in place, producing an incredibly firm, mechanical hold without relying on modern fasteners like screws or nails.
Understanding the Basics
Before delving into the process, it is important to understand the basic components:
- Mortise: A hole or cavity cut into a piece of wood to receive the tenon.
- Tenon: A projection on the end of a piece of wood, shaped to fit into the mortise.
- Wedge: A small piece of wood driven into a slot in the tenon to force it outward and lock it tightly in the mortise.
In a traditional mortise and tenon joint, the tenon fits snugly into the mortise. But over time, due to wood shrinkage or wear, such joints may loosen. The wedged mortise and tenon variation counteracts this by mechanically expanding the tenon once inserted, locking it in place permanently.
When to Use a Wedged Joint
This technique is particularly useful in applications where high tensile or lateral strength is necessary. Typical uses include:
- Chair and table legs
- Door frames
- Timber framing
- Workbenches
- Frame-and-panel doors
A wedged joint is also ideal when working with through tenons, which extend beyond the mortise and are visible on the opposite side. In such cases, the wedges can add a decorative flair as well as structural integrity.
Tools and Materials Needed
To execute a wedged mortise and tenon joint, you’ll need the following:
- Chisels (for mortising)
- Tenon saw or table saw (for tenon cutting)
- Mallet
- Marking gauge or knife
- Clamps
- Drill and bits (optional, to clear waste before chiseling)
- Wedges (typically made of hardwood)
- Wood glue (optional)
- Workbench or secure clamping surface
Step-by-Step Process
1. Planning and Measuring
As with any woodworking project, careful planning is key. Determine the dimensions of your mortise and tenon based on the thickness and width of the materials. A general rule is that the tenon should be about one-third the thickness of the stock and approximately two-thirds the width of the receiving piece.
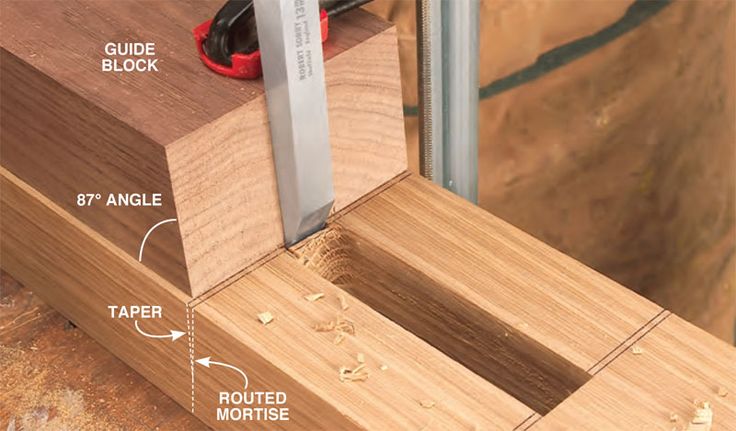
2. Cutting the Mortise
Mark the mortise location on your workpiece using a marking gauge or knife for accuracy. If using hand tools, drill out the bulk of the waste using a drill bit, then clean up the sides with a chisel. The mortise should be straight, square, and deep enough to accept the tenon plus a little room for glue squeeze-out if used.
3. Cutting the Tenon
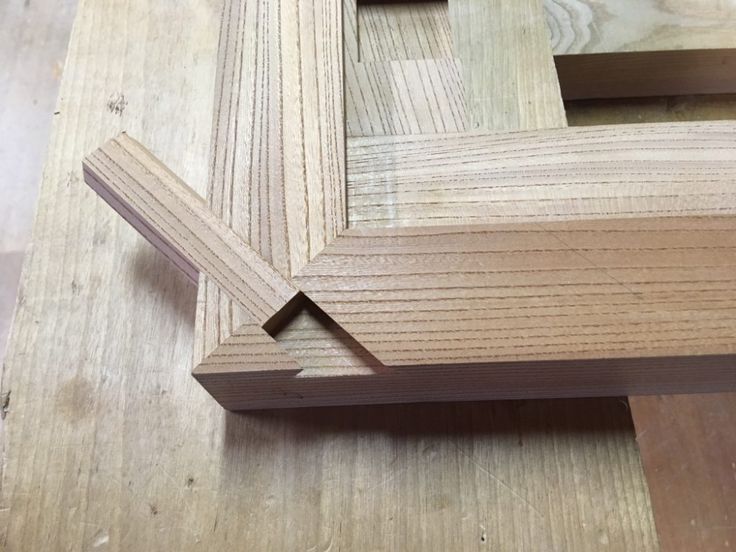
Transfer the mortise dimensions to the tenon workpiece. Saw the shoulders and cheeks of the tenon carefully. Then, cut two small kerfs in the end of the tenon to create slots for the wedges. These kerfs should be angled slightly outward so that the wedges will drive the tenon sides outward once inserted.
4. Test Fit
Dry-fit the tenon into the mortise without wedges to ensure a snug fit. The tenon should insert fully with minimal force, and the shoulders should sit flush with the face of the mortised piece. If adjustments are needed, pare the tenon carefully with a chisel.
5. Shaping the Wedges
Wedges should be made from a hardwood such as oak or maple for durability. They should taper from approximately 1/8″ thick down to a sharp point. The width should match or slightly exceed the width of the kerfs in the tenon. Optionally, you can chamfer the edges or shape them decoratively if the joint will be visible.
6. Assembly
Apply glue to the tenon and inside the mortise if desired. Insert the tenon into the mortise. Then, place the wedges into the kerfs and gently tap them in using a mallet. The action of the wedges will force the outer edges of the tenon to spread, locking them tightly against the walls of the mortise. Ensure that the shoulders remain flush during this process.
7. Trimming and Finishing
Once the glue (if used) has dried, trim the protruding end of the tenon flush with the surface using a flush-cut saw or chisel. If the tenon is intended to be a decorative through tenon, you may want to leave it proud of the surface and sand it smooth. Finally, sand and finish the surrounding surfaces as needed.
Common Mistakes and How to Avoid Them
- Too Loose a Fit: If the tenon is too small, it won’t lock effectively even with wedges. Always aim for a snug dry fit.
- Improper Wedge Angle: Wedges that are too steep or shallow may not hold. Aim for about a 6–10° taper.
- Splitting the Tenon: Driving wedges too forcefully or using wedges that are too large can split the tenon. Start with gentle taps and check progress.
Variations and Advanced Techniques
There are several variations of the wedged mortise and tenon joint, including:
- Double-wedged tenons: For wider joints, two kerfs and corresponding wedges provide even more security.
- Fox-wedged tenons: A blind version where the wedges are inserted inside a closed mortise and flare the tenon internally.
- Decorative wedges: Contrasting wood species can be used for the wedges to add a decorative element to furniture pieces.
Each variation has unique applications, but all maintain the fundamental principle of mechanical locking through wedge-induced expansion.
Advantages of the Wedged Mortise and Tenon
- Mechanical strength: Offers exceptional resistance to pulling forces.
- No metal fasteners required: Ideal for traditional or all-wood joinery.
- Durability: Less likely to loosen over time compared to glued joints alone.
- Aesthetic appeal: Particularly in visible through-tenon applications.
Conclusion
The wedged mortise and tenon process exemplifies the union of form and function in woodworking. By understanding and mastering this technique, woodworkers can produce joints that are not only robust and enduring but also beautiful in their craftsmanship. Though it may require more precision and effort than simpler methods, the payoff in strength and visual character is well worth it. Whether you’re building a centuries-old timber frame or a contemporary piece of fine furniture, this joinery method remains one of the most trusted and elegant options in the woodworker’s toolkit.