Creating a wooden cabinet is a rewarding and practical woodworking project that combines craftsmanship, precision, and creativity. Whether you’re a professional carpenter or an enthusiastic DIYer, understanding the process involved in making a wooden cabinet ensures a durable, aesthetically pleasing piece of furniture. Below is a comprehensive guide outlining each step of the process—from initial planning to the final touches.
1. Planning and Design
Before any cutting or assembling begins, it’s important to define the purpose, style, size, and design of the cabinet. Ask yourself the following questions:
- What will the cabinet be used for? (Kitchen, bathroom, storage, etc.)
- What are the dimensions of the space it will occupy?
- Do you want it freestanding or built-in?
- What type of wood suits the intended use and aesthetic?
Sketching a rough design helps visualize the cabinet’s layout, including the number of shelves, drawers, and doors. Software like SketchUp can be used for more precise 3D modeling.
2. Choosing the Right Wood
The choice of wood affects not just the look but also the longevity of the cabinet. Popular wood types for cabinets include:
- Plywood: Often used for cabinet boxes due to its strength and affordability.
- Maple: Durable and great for painted finishes.
- Oak: Known for its grain and strength.
- Cherry or Walnut: More expensive, but provide rich color and character.
Wood should be kiln-dried to minimize warping and ensure longevity. Check each board for cracks, knots, or warps before purchasing.
3. Measuring and Cutting Materials
After the design is finalized, create a cut list with all required pieces: side panels, top and bottom panels, shelves, doors, back panel, and face frames. Measurements must be exact for proper fitting.
Use tools like:
- Table saw or circular saw (for long cuts)
- Miter saw (for crosscuts)
- Jigsaw (for intricate curves or openings)
Ensure all cuts are square and sand any rough edges lightly to remove splinters.
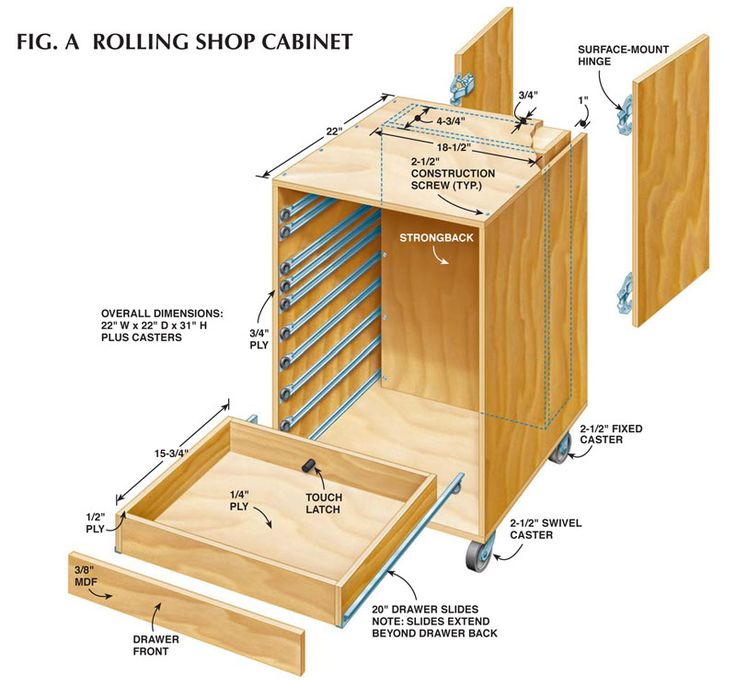
4. Constructing the Cabinet Box
The cabinet box, also called the carcass, is the structure that holds everything together. It typically includes:
- Sides
- Top and bottom panels
- Back panel (optional, depending on design)
Use wood glue and screws or pocket hole joinery to assemble the carcass. A clamp can hold pieces in place while the glue dries. Ensure the box is square by measuring the diagonals; they should be equal.
5. Adding the Face Frame (Optional)
Face frames are commonly added to traditional cabinets for a refined look and added strength. They consist of horizontal rails and vertical stiles, often made of hardwood.
Assemble the face frame separately using pocket screws or dowels, then attach it to the front of the cabinet box using wood glue and clamps. Sand any joints to make them flush.
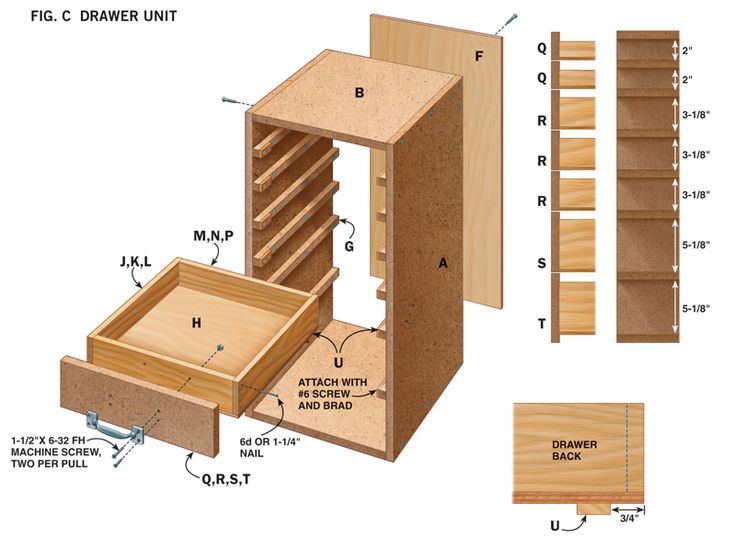
6. Installing Shelves and Dividers
Shelves can be fixed or adjustable. For adjustable shelving, drill holes for shelf pins using a shelf pin jig. Fixed shelves are glued or screwed in place.
Add internal dividers if needed for drawers or organizational compartments. Precision in placement is essential, especially if you’re installing drawer slides later.
7. Building and Fitting Doors and Drawers
Doors
There are several types of cabinet doors: slab, shaker-style, raised panel, etc. Choose the one that complements your design.
- Slab doors: Simple and modern, made from a single flat panel.
- Shaker doors: Frame-and-panel construction with a recessed center.
Ensure accurate measurements so the doors fit within the opening with an even gap all around. Use concealed or traditional hinges for installation.
Drawers
Build drawer boxes using plywood or solid wood. Join the pieces using dovetail, box joints, or simple butt joints with screws and glue.
Attach the drawer front to the box and install drawer slides according to the manufacturer’s instructions. Check for smooth operation.
8. Sanding and Surface Preparation
Thorough sanding is critical for a smooth, professional finish. Start with coarse-grit sandpaper (e.g., 80) and progress to finer grits (e.g., 180–220). Sand all surfaces, edges, and corners evenly.
After sanding, remove all dust using a vacuum, tack cloth, or damp rag. Clean surfaces are essential before applying any finish.
9. Finishing: Painting or Staining
The choice of finish affects both aesthetics and protection.
- Staining enhances the natural wood grain.
- Painting offers color options and a smoother, contemporary appearance.
- Clear finishes (like polyurethane, lacquer, or shellac) protect the wood without altering its color much.
Apply the chosen finish using a brush, spray gun, or rag. Multiple thin coats are better than one thick coat. Allow proper drying time and lightly sand between coats for a smooth result.
10. Attaching Hardware
Once the finish is completely dry, install the hardware:
- Hinges: Attach to the door and cabinet box.
- Handles and knobs: Use a jig to ensure consistent placement.
- Drawer slides: Ensure they are level and operate smoothly.
Soft-close mechanisms can be added for a touch of luxury and noise reduction.
11. Final Assembly and Installation
If the cabinet is freestanding, this is the final step. For built-in cabinets:
- Secure the cabinet to the wall studs using screws through the back panel or mounting strips.
- Use shims to level the cabinet.
- Seal any gaps between the cabinet and wall with caulk or trim molding.
Make final adjustments to doors and drawers for proper alignment and clearance.
12. Maintenance and Care
A well-built wooden cabinet can last decades with minimal care. Periodically:
- Check and tighten any loose hardware.
- Clean surfaces with a damp cloth—avoid harsh chemicals.
- Refinish or touch up scratches as needed.
Conclusion
The process of making a wooden cabinet involves careful planning, accurate measurements, and attention to detail throughout every stage. From selecting the wood to applying the final finish, each step builds toward a functional and beautiful piece of furniture. Whether you are building your first cabinet or refining your craft, following this structured approach will lead to satisfying, high-quality results.
By understanding the complete cabinet-making process, you can tailor your project to your specific needs and style preferences, ensuring the final product is something you can be proud of.