In an era where environmental consciousness and resource conservation are more important than ever, harvesting rainwater is a smart and sustainable choice for homeowners. Not only does it reduce reliance on municipal water supplies, but it also cuts down on water bills and helps the planet. Best of all, building your own DIY rainwater harvesting system is surprisingly straightforward and cost-effective. This guide will walk you through the essentials of rainwater harvesting and show you how to set up a basic system at home.
Why Harvest Rainwater?
Rainwater harvesting is the process of collecting and storing rainwater for later use. It’s a centuries-old practice that’s gaining renewed interest due to rising water costs, drought conditions, and a general push for sustainability.
Here are a few compelling reasons to start harvesting rainwater:
- Save money: You can use harvested rainwater for gardening, lawn care, car washing, flushing toilets, and more—reducing your water bill.
- Conserve water: This is especially important in areas prone to drought or with limited water infrastructure.
- Reduce runoff: Collecting rainwater minimizes stormwater runoff, which can cause erosion and carry pollutants to local waterways.
- Improve plant health: Rainwater is naturally soft and free of chemicals like chlorine and fluoride, making it ideal for plants.
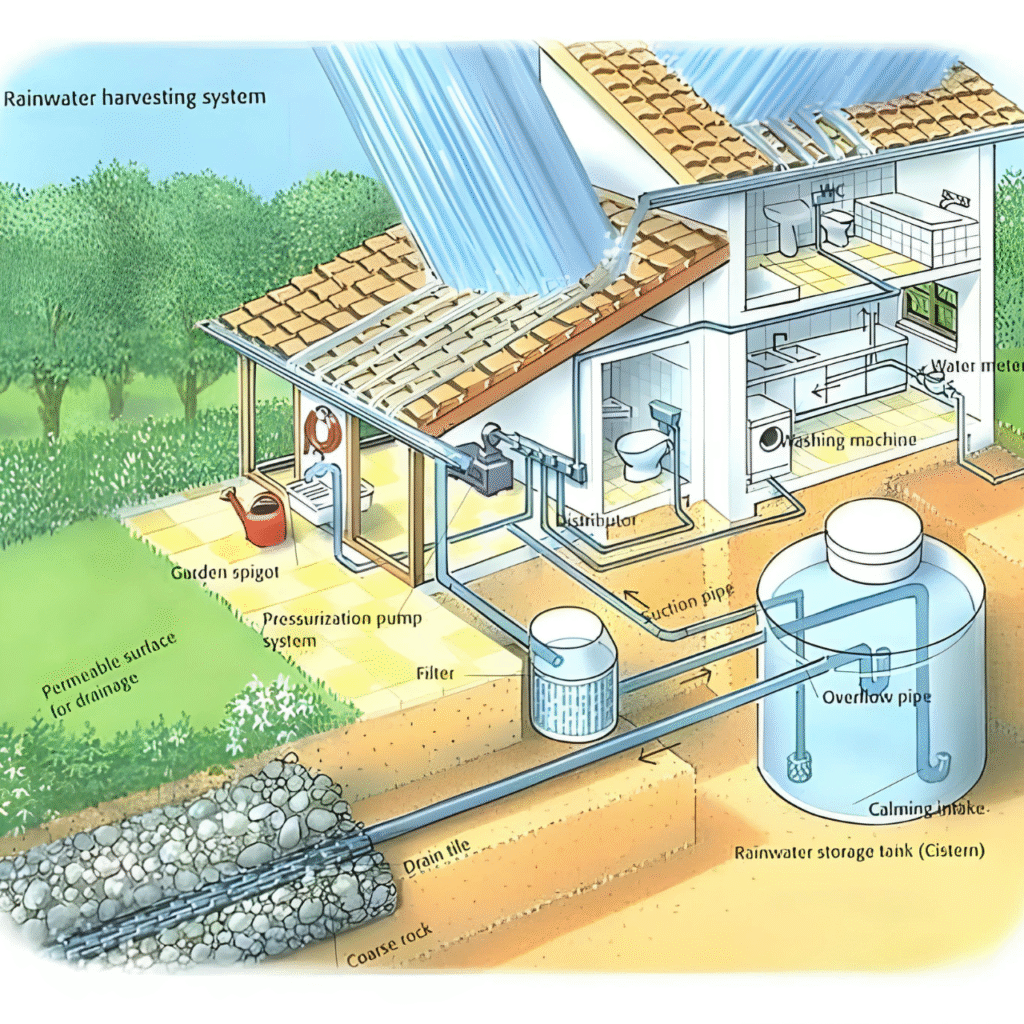
Basic Components of a Rainwater Harvesting System
A typical rainwater harvesting setup consists of:
- Catchment area – Usually your roof.
- Gutters and downspouts – Direct rainwater from the roof to your storage container.
- First flush diverter – Diverts the initial dirty runoff from the roof away from the storage tank.
- Storage tank or barrel – Holds the collected water.
- Filtration system (optional) – Filters debris or contaminants if you plan to use water for indoor or drinking purposes.
- Spigot or pump – To access the stored water easily.
Step-by-Step Guide to Building a DIY System
Step 1: Assess Your Roof and Rainfall
Start by estimating how much rainwater you can collect. Use this simple formula:
Roof Area (sq. ft.) × Rainfall (inches) × 0.623 = Gallons Collected
For example, a 1,000 sq. ft. roof in an area with 30 inches of annual rainfall can collect about 18,690 gallons of water per year. This helps you determine the size and number of barrels or tanks you’ll need.
Step 2: Gather Materials
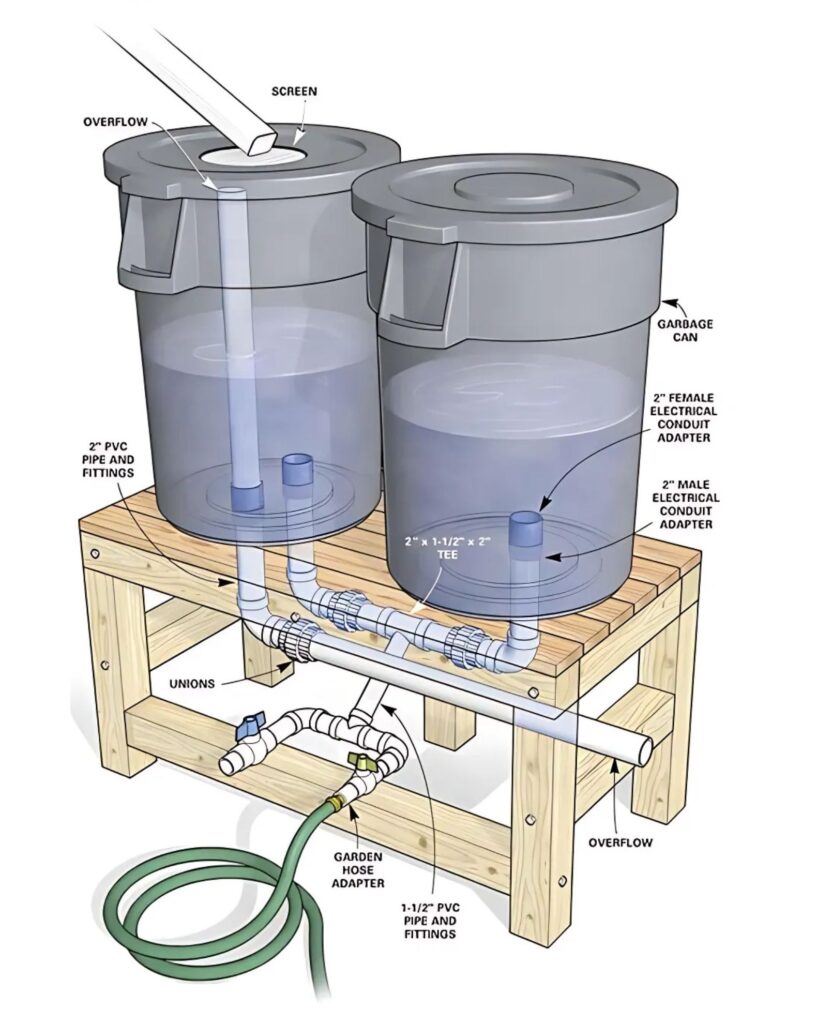
For a basic barrel system, you’ll need:
- A food-grade plastic barrel (55 gallons is standard)
- Gutter diverter or downspout adapter
- Screen or mesh filter to keep out debris and mosquitoes
- Drill and hole saw
- Faucet or spigot
- Hose clamp and Teflon tape
- Bricks or cinder blocks for elevation
Optional: A first-flush diverter and a small pump if you’re planning to use the water under pressure (e.g., for irrigation systems).
Step 3: Install or Modify Gutters
If your home already has a gutter system, ensure it’s clean and directs water efficiently toward one or two main downspouts. If not, install a basic gutter system to channel water from your roof. Position your rain barrel under a downspout.
Step 4: Prepare the Barrel
Drill a hole near the bottom of the barrel and install the spigot, using Teflon tape to prevent leaks. Elevate the barrel using bricks or a stand to create gravity-fed pressure. Add a screened hole on the top to let water in while keeping debris and insects out. Some people prefer installing an overflow outlet near the top, which can be directed to another barrel or back into the drain.
Step 5: Connect the Downspout
Attach a diverter or cut the downspout to direct water into your barrel. If using a diverter, it will automatically bypass the barrel once it’s full. This reduces overflow risks and protects your foundation.
Step 6: Add a First-Flush Diverter (Optional but Recommended)
The first few gallons of rainwater usually contain the most contaminants—dust, bird droppings, and leaves. A first-flush diverter prevents this water from entering your storage tank, improving the quality of the collected water.
Step 7: Maintenance and Safety
Check and clean the system regularly—especially screens and filters. Mosquito-proof your barrel with tight-fitting lids or screens. Use the collected water within a few weeks to prevent stagnation.
If you’re storing rainwater for household use beyond gardening (like flushing toilets or washing clothes), you’ll need to install filtration and potentially disinfection systems to ensure safety.
Advanced Options and Expansions
Once you’re comfortable with a basic setup, you can scale up:
- Multiple barrels connected in series to store more water.
- Large cisterns or underground tanks for greater capacity.
- Gravity-fed irrigation systems with soaker hoses or drip lines.
- Solar-powered pumps for increased pressure and reach.
- Greywater systems to reuse water from showers, sinks, or laundry.
Legal Considerations
Before installing your system, check local regulations. In most places, rainwater harvesting is legal and encouraged, but some states or municipalities may have restrictions or require permits.
Cost Breakdown
Here’s a rough estimate of a basic DIY rainwater system:
- Barrel: $30–$100 (free if repurposed)
- Spigot and hardware: $10–$25
- Downspout diverter: $20–$40
- First-flush diverter: $20–$50
- Gutter components (if needed): $30–$100
Total: $80–$300 for a simple, functional system—much less than professionally installed systems.
Tips for Maximizing Efficiency
- Keep gutters and screens clean.
- Use dark-colored barrels to discourage algae growth.
- Place barrels in shaded areas to keep water cool.
- Label barrels clearly if using water for different purposes (e.g., irrigation vs. household use).
- Use overflow water to irrigate non-edible landscaping.
Conclusion
A DIY rainwater harvesting system is a practical, eco-friendly investment that pays for itself in water savings and environmental benefits. It empowers you to take control of your water use, contribute to sustainability, and even gain a sense of self-sufficiency. Whether you start with a single barrel or build a more elaborate system, every drop you collect helps conserve one of Earth’s most precious resources. So grab your tools, roll up your sleeves, and start harvesting the rain—your garden, wallet, and planet will thank you.